Sunday, May 26, 2013

Raspberry Pi GPIOs

GPIO : General Purpose Input Output

Consider a GPIO as a pin whose behavior will be controlled by the software. The raspberry pi board has a 26-pin expansion header containing 17 GPIO pins that can be used to control external devices (lights, LCD display, ...) or to read information from the outside (temperature sensor, ADC output, etc ...).


As shown on the picture, some of the GPIOs are already used (depending on your kernel) for communication lines such as I2C, SPI or UART. It doesn't mean that we can't use them for other purposes, their usage can be customized.

GPIO voltage level

1 : High-Level : 3,3V
0 : Low-Level : 0V
Current is configurable from 2mA up to 16mA (for the whole block, no just only one pin)

Important note : there is no over-voltage protection circuit on the board. Be careful when plugging your active devices.

GPIO control

Two choices here :

  • usage of the kernel drivers in arch/arm/mach-bcm2708 (not included in vanilla kernel sources)
  • usage of a dedicated library installed in user space

Note : the raspberry pi is usually referred as bcm2835 but some of the drivers are located in bcm2708 directory. Technically bcm2708 is the chip family and bcm2835 is one of its implementation, the only one officially supported by linux.

Sunday, May 19, 2013

Build a minimalist root filesystem

During my research, I have seen many different tutorials to create a minimalist root filesystem. Some of them advise to copy files from the host's root filesystem and then proceed to customization, others use very handy tools like Buildroot and finally some people create it manually.

It is this last option that we will experiment here thanks to this twiki written by T.I.

Our root filesystem is based on BusyBox which offers the main linux command line utilities in a single executable.

Build BusyBox

Download the latest release of busybox on the official website and extract it to your working directory.
cd busybox-1.21.0
make menuconfig
Follow the instructions as detailed in the T.I. twiki to customize your binary. I have made some different choices here and there to add additional commands like fdisk. Do as you like, it does not really matter...

Build ...
ARCH=arm CROSS_COMPILE=arm-linux-gnueabi- make
... and install it on the second partition of your SD Card :
make CONFIG_PREFIX=/media/<path_to_your_sd_card_p2> install
Here is what you should see on your partition after the last step :
bin  linuxrc  lost+found  sbin  usr

Create compulsory directories

The official rules to build a root filesystem are detailed in the Filesystem Hierarchy Standard (FHS). Here is a complete list of the top level directories :

bin : essential user command binaries
boot : files used by the bootloader
dev : devices files
etc : system configuration files
home : users home directory
lib : essential libraries (C library, kernel modules,...)
media : mount points for removable medias
mnt : mount points for temporarily mounted filesystems
opt : Add-on software packages
proc : virtual filesystem for kernel and process information
root : root user's home directory
sbin : essntial system administration binaries
sys : virtual filesystem for system information and control
tmp : temporary files
usr : secondary hierarchy containing most applications and documents useful to most users
var : variable data stored by daemons and utilities

We don't need all of them as we won't provide a multi-user environment. /home, /mnt, and /opt can be ommited.

Create the directories (as root)

cd /media/<path_to_your_sd_card_p2>
sudo mkdir dev dev/pts etc etc/init.d lib mnt opt proc root sys tmp var var/log
Optional : debug is needed by debugfs, add it if your kernel has been built with this option
sudo mkdir debug

Create a static node for console

Like Unix systems, every object in Linux is visible as a file (except for networking interfaces). As such, /dev contains device files (nodes) that represent the system devices. This directory needs to be populated either statically (old fashion way, every node has to be created manually with mknode) or dynamically (common way thanks to udev or mdev).

In our case, we will only add a node for the console.
mknod dev/console c 5 1
The rest of the nodes will be added by mdev which is part of BusyBox.
cd etc
gedit mdev.conf
audio       0:5 0666
console     0:5 0600
control.*   0:0 0660 @/bin/mv /dev/$MDEV /dev/snd/
dsp         0:5 0666
event.*     0:0 0600 @/bin/mv /dev/$MDEV /dev/input/
fb          0:5 0666
nfs         0:5 0770
null        0:0 0777
pcm.*       0:0 0660 @/bin/mv /dev/$MDEV /dev/snd/
rtc         0:0 0666
tty         0:5 0660
tty0*       0:5 0660
tty1*       0:5 0660
tty2*       0:5 0660
tty3*       0:5 0660
tty4*       0:5 0660
tty5*       0:5 0660
tty6*       0:5 0660
ttyS*       0:5 0640
urandom     0:0 0444
zero        0:0 0666

Create an fstab file to mount /proc and /dev/pts at boot

fstab is system configuration file used to list the available disks and disk partitions and describes how they are initialized. The mount command relies on this file to determine which option should be used when mounting a specific device.
# still in /etc
gedit fstab
proc            /proc           proc    defaults        0 0
none            /dev/pts        devpts  mode=0622       0 

Login utilities

/etc must contain the files group, passwd and hosts for login. For the moment, root only needs to be defined in group and hosts only needs to have the localhost registered.
gedit group
root:x:0:root
gedit passwd
root::0:0:root:/root:/bin/ash
gedit hosts
127.0.0.1       localhost

Create inittab

Read this post for information about inittab.
gedit inittab
::sysinit:/etc/init.d/rcS 

# /bin/ash
#
# Start an "askfirst" shell on the serial port
console::askfirst:-/bin/ash

# Stuff to do when restarting the init process
::restart:/sbin/init

# Stuff to do before rebooting
::ctrlaltdel:/sbin/reboot
::shutdown:/bin/umount -a -r
::shutdown:/sbin/swapoff -a

Create init script

gedit init.d/rcS
#!/bin/sh
#   ---------------------------------------------
#   Common settings
#   ---------------------------------------------
HOSTNAME=MYPI
VERSION=1.0.0

hostname $HOSTNAME

#   ---------------------------------------------
#   Prints execution status.
#
#   arg1 : Execution status
#   arg2 : Continue (0) or Abort (1) on error
#   ---------------------------------------------
status ()
{
       if [ $1 -eq 0 ] ; then
               echo "[SUCCESS]"
       else
               echo "[FAILED]"

               if [ $2 -eq 1 ] ; then
                       echo "... System init aborted."
                       exit 1
               fi
       fi

}

#   ---------------------------------------------
#   Get verbose
#   ---------------------------------------------
echo ""
echo "    System initialization..."
echo ""
echo "    Hostname       : $HOSTNAME"
echo "    Filesystem     : v$VERSION"
echo ""
echo ""
echo "    Kernel release : `uname -s` `uname -r`"
echo "    Kernel version : `uname -v`"
echo ""


#   ---------------------------------------------
#   MDEV Support
#   (Requires sysfs support in the kernel)
#   ---------------------------------------------
echo -n " Mounting /proc             : "
mount -n -t proc /proc /proc
status $? 1

echo -n " Mounting /sys              : "
mount -n -t sysfs sysfs /sys
status $? 1

echo -n " Mounting /dev              : "
mount -n -t tmpfs mdev /dev
status $? 1

echo -n " Mounting /dev/pts          : "
mkdir /dev/pts
mount -t devpts devpts /dev/pts
status $? 1

echo -n " Enabling hot-plug          : "
echo "/sbin/mdev" > /proc/sys/kernel/hotplug
status $? 0

echo -n " Populating /dev            : "
mkdir /dev/input
mkdir /dev/snd

mdev -s
status $? 0

#   ---------------------------------------------
#   Disable power management
#   (Requires sysfs support in the kernel)
#   ---------------------------------------------
# echo -n " Disabling Power mgmt       : "
# echo -n "1" > /sys/power/cpuidle_deepest_state
# status $? 1

#   ---------------------------------------------
#   Turn off LCD after 1 hour of inactivity
#   (Requires sysfs support in the kernel)
#   ---------------------------------------------
# echo -n " Turn off LCD after 1 hour  : "
# echo -n "3600" > /sys/power/fb_timeout_value
# status $? 1


#   ---------------------------------------------
#   Mount the default file systems
#   ---------------------------------------------
echo -n " Mounting other filesystems : "
mount -a
status $? 0


#   ---------------------------------------------
#   Set PATH
#   ---------------------------------------------
export PATH=/bin:/sbin:/usr/bin:/usr/sbin:/usr/local/bin


#   ---------------------------------------------
#   Start other daemons
#   ---------------------------------------------
echo -n " Starting syslogd           : "
/sbin/syslogd
status $? 0

echo -n " Starting telnetd           : "
/usr/sbin/telnetd
status $? 0


#   ---------------------------------------------
#   Done!
#   ---------------------------------------------
echo ""
echo "System initialization complete."


make it executable
chmod +x rcS

Copy the dependencies 

We built BusyBox with the ARM cross toolchain as a C program without the -static option, which means that it will look for C libraries at runtime.We have to add them !

Note : Use ldd to list the dependencies of a binary

cd /media/<path_to_your_sd_card_p2>/lib
# Copy the C libraries
copy -r /usr/arm-linux-gnueabi/lib/* .
# Remove the debug informations from the libraries to save space
arm-linux-gnueabi-strip 

At this point, you have a valid root filesystem with the bare minimum. It does not include the kernel modules yet and if you want to add more executables, you'll also need to add their dependencies. The filesystem will get larger when these files are added.

First boot

Here is my display at first boot :


This time, there is no panic displayed. The kernel finds the init process and executes our script.
To access BusyBox press Enter :


Saturday, May 11, 2013

Compile the Linux Kernel (part1)

Compile the Linux Kernel (part1)


Les distributions classiques fournissent des noyaux binaires pré-compilés, soit sous forme d’archives RPM dans le cas des distributions Red Hat, soit sous forme d’archives DEB dans le cas de la distribution DEBIAN.

L’utilisation de Linux dans un environnement industriel embarqué obligera à adapter le noyau à l’environnement matériel.

Il peut arriver que certains pilotes de périphériques ne soient par fournis sur l’archive officielle du noyau Linux.

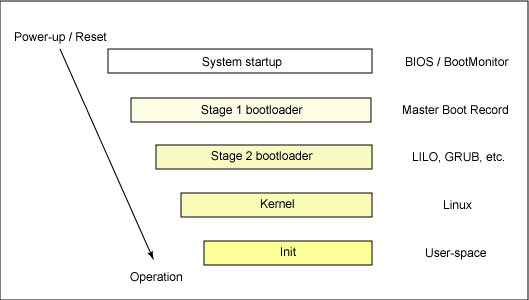
Le noyau est tout simplement le programme qui gère les interactions entre le matériel et les autres programmes. C'est lui qui amorce le système d'exploitation.

Une chose que beaucoup de personnes ne comprennent pas est que le noyau est un programme comme les autres, vous pouvez parfaitement avoir plusieurs noyaux et utiliser celui de votre choix.

Pourquoi compiler son noyau ? Les noyaux fournis par défaut dans votre distribution /Linux sont des noyaux capables de tourner sur un maximum de machines et de matériels. Ils sont donc souvent plus lourds, mais la différence de rapidité est en général assez faible. En fait les vraies raisons de compiler son propre noyau sont les suivantes :

  1. Comprendre comment fonctionne le noyau Linux.
  2. Faire fonctionner un matériel qui n'est pas pris en charge par votre noyau actuel.
  3. Appliquer un correctif.
  4. Vous voulez utiliser une distribution qui oblige de compiler votre noyau.

La compilation du noyau est longue et demande beaucoup d'attention sous peine de ne plus pouvoir démarrer sa machine. Si vous n'avez pas le temps de lire beaucoup de documentation et si vous n'êtes pas prêt à galérer sérieusement, alors inutile de vous fatiguer pour rien.
Ce qui nous intéresse ici est la compilation de noyau destiné à l'embarqué et particulièrement aux architectures ARM.

Il est possible d'émuler la plateforme ARM sur votre poste de travail Linux pour tester les kernel compilés avec Qemu.

List all installed package on your Ubuntu system:
serge#> dpkg –get-selections
Install the ARM toochain:
serge#> sudo apt-get install gcc-arm-linux-gnueabi
Check the proper installation of the package :
serge#> dpkg --get-selections | grep arm

Télecharger un emulateur ARM (QEMU) pour tester vos kernel (en attendant le matériel).

List all available package with the name qemu to download :
serge#> apt-cache search qemu
serge#> sudo apt-get install qemu
serge#> sudo apt-get install qemu-kvm-extras


Pour Information, le noyau est identifié par un triplet version.révision.patch, exemple 2.4.13
Les révisions paires identifient des noyaux stables. En toute rigueur, ce sont les seuls qu’il faut utiliser dans le cas de produits industriels. Les révisions impaires sont des noyaux de développement. La fréquence de diffusion de ces noyaux peut être très élevée, parfois un par semaine ou plus. Leur utilisation n’est absolument pas recommandée pour des applications industrielles.

Pour commencer, récupérer la dernière version du noyau 3.8.9 depuis :

Créer un répertoire de travail en local et copier l'archive téléchargée dans ce nouveau répertoire:

serge#> cd /home/serge
serge#> mkdir kernel_compilation
serge#> cp ./Downloads/linux-3.8.9.tar.xz ./kernel_compilation/
serge#> cd kernel_compilation/
serge#> ls -lrt

Décompresser l'archive dans le répertoire kernel_compilation :
serge#> tar -xvf linux-3.8.9.tar.xz

Voici une brève description des fichiers et sous-répertoires de l’arborescence du noyau :


arch contient le code source spécifique des architectures matérielles comme x86, ppc, alpha ou m68k.

Documentation contient des fichiers de documentation au format.

drivers contient l’arborescence des divers pilotes de périphériques.

fs contient le code source des différents systèmes de fichiers, ou file-systems supportés par le noyau. Nous pouvons citer par exemple ext2, vfat ou iso9660.

include contient les fichiers d’en-tête C nécessaires à la compilation du noyau mais également au développement d’applications.

init contient le fichier principal main.c, contenant la fonction principale main(), du noyau Linux.

ipc contient le code source de la version des IPC System V du noyau Linux.

kernel contient le code source des fonctions majeures du noyau comme la gestion des tâches ou des processus.

mm contient les fonctions de gestion de la mémoire ou memory-management.

net contient le code source des différents protocoles réseau supportés par le noyau Linux. Nous pouvons citer ipv4, ipv6 ou x25.

scripts contient le code source des outils de configuration du noyau.

Makefile et Rules.make sont les fichiers utilisés par la commande make lors de la compilation du noyau.

sound contient dans le cas du noyau 2.6 les pilotes ALSA (Advanced Linux Sound Archicture) désormais intégrés en standard aux sources du noyau.

Télécharger Git, le svn de Linux pour faire de la gestion de configuration :
serge#> apt-cache search git
serge#> sudo apt-get install git


L'adresse du repository Git de travail est la suivante: https://linux389pi@bitbucket.org/linux389pi/linux389pi.git
L'adresse du repository officiel de la Rasperry est:
https://github.com/raspberrypi/linux

Clôner le répertoire de travail en local depuis le repository Git (équivalent svn checkout):
serge#> git clone https://linux389pi@bitbucket.org/linux389pi/linux389pi.git

Au cas où, faire un pull ou fetch pour récupérer les derniers fichiers du repository (equivalent à svn update):
serge#> cd ~/kernel_compilation/linux389pi/arch/arm/configs
serge#> git pull origin

Go to the configuration folder to check the default configuration :
serge#> cd /home/serge/kernel_compilation/linux389pi/arch/arm/configs

Check the presence of the Rasperry Pi configuration file
bcmrpi_deconfig

Define your local environment before compilation:
serge#> export ARCH=arm
serge#> export CROSS_COMPILE=arm-linux-gnueabi-
serge#> alias make='make -j8'
Comment: The number coming after the “j” letter is obtained by doing: 2*<number of CPUs>

You can get the number of CPU by checking the file:
cat /proc/cpuinfo
Configure the kernel from the root of your working directory:
serge#> cd ~/kernel_compilation/linux389pi
serge#> make bcmrpi_defconfig
After entering the command, a .config file should be generated.
Build the kernel from the root of your working directory:
serge#> cd ~/kernel_compilation/linux389pi
serge#> make
If building the kernel produces compilation errors, fix the errors and perform a clean before rebuilding again with the command:
serge#> make mrproper

Correcting the build errors by applying a patchfile to the vanilla kernel

The vanilla kernel version is not adapted to compile for an ARM architecture, that is why we encountered compiling errors. In order to fix these errors, we are going to apply a patchfile to the vanilla version.

First, Go to the main directory
cd kernel_compilation/
Rename the directory you downloaded from your central repository:
mv linux389pi linux_vanilla_kernel
Go inside the Official Raspberry Pi directory you downloaded rom the official website:
cd rpi-3.8.y/
Initialize a new local git repository on this directory:
git init
git add .
Commit all the subdirectories
git commit -m "added : rpi-3.8.y sources"
Add a new local repository from the Pi repository and fetch:
git remote add vanilla ../linux_vanilla_kernel/
git fetch vanilla
Generate the patch file based on the deltas between vanilla kernel version and the official Rasperry Pi version:
git diff --no-prefix vanilla/master HEAD > patchfile
Move the patchfile to the vanilla kernel directory:
mv patchfile ../linux_vanilla_kernel/
Apply the patchfile to the vanilla version
patch -p0 < patchfile
Rebuild the kernel:
make mrproper
export ARCH=arm
export CROSS_COMPILE=arm-linux-gnueabi-
alias make='make -j8'
make bcmrpi_defconfig
make

Check that no errors occurred.

Linux init process

As we have seen before, the usual boot sequence of a Linux-based platform consists of several steps :


The init process :
  • completes the boot procedure
  • have the process ID '1'
  • starts the system processes (as described in /etc/inittab)
  • is not part of the kernel, it belongs to the user space ( /sbin/init )
  • never dies : it handles the operating system's life cycle (restart, shutdown,..)
There are many alternatives for the init process, it is usually installed with one of the following startup programs :

  • sysvinit : linux traditional init program
  • upstart : used by most of the linux distributions
  • systemd : Fedora
  • busybox : for small embedded systems
When built, these projects generate an init process and a set of common tools like telinit or initctl.

Run level

At boot, init checks the inittab configuration file for the runlevel parameter. This value goes from 0 to 6 and a specific set of actions is executed for each of them.


Depending on the default init level setting, the system will execute the programs from one of the following folders :

  • Run level 0 : /etc/rc.d/rc0.d
  • Run level 1 : /etc/rc.d/rc1.d
  • Run level 2 : /etc/rc.d/rc2.d
  • Run level 3 : /etc/rc.d/rc3.d
  • Run level 4 : /etc/rc.d/rc4.d
  • Run level 5 : /etc/rc.d/rc5.d
  • Run level 6 : /etc/rc.d/rc6.d
In these directories, the program names start with either S or K followed with a sequence number and the program name.
  • The programs starting with an S are executed on system Start while the programs starting with a K are executed on system Kill. 
  • The sequence number indicates when the program has the be executed.
For example, S12syslog has to be started before S80sendmail.

Thursday, May 9, 2013

Prepare your SD Card to boot a kernel

Read this post for the kernel build instructions.
Read this post if you're interested in how the pi boots once powered up.
Read this post for the partitioning instructions.

The following files are needed on your boot partition :

- bootcode.bin
- start.elf
- fixup.dat
- cmdline.txt
- kernel.img

To get (most of) them, you can either clone this repo : https://github.com/raspberrypi/firmware.git
or download the latest repository content here.

Note : The source code of bootcode.bin and start.elf is not open source.

First boot

For the first boot tryout, we will use the files provided by the raspberry pi foundation. We voluntarily omit the modules and the file system for now, we just want to see if the booting chain is OK until the startup of the init process.

Copy bootcode.bin, start.elf, fixup.dat and kernel.img to the boot partition of your SD card.
Create a text file named cmdline.txt right next to these files and add the following kernel parameters to it :
root=/dev/mmcblk0p1 rootdelay=2
Unmount the sdcard, plug it to your Pi, power up, and pray...

Here is the resulting display :


As we can see, the kernel boots perfectly until trying to start the init process :-)

Kernel image

We want to use our own-built kernel :
# Go the build output directory
 cd /arch/arm/boot 
# Backup the previous kernel image
mv /media/mysdcard/boot/kernel.img /media/mysdcard/boot/kernel.img.backup
# Copy the kernel image to your sd card and rename it
cp Image /media/mysdcard/boot/kernel.img
Here is the result with our image :


The result is identical (except for 2 or 3 different log traces). We can now step further ...


Sunday, May 5, 2013

Raspberry Pi boot sequence

Read this post if you are not familiar with bootloaders.
For a long time, the boot sequence consisted of 3 stages as shown above. Lately, the 3rd stage has been short circuited : the start.elf image is now directly read by the 2nd stage bootloader.

Saturday, May 4, 2013

Partition your SD Card for Pi

Create the parition table

1. Plug your SD Card to your computer.

2. Identify your /dev/ node

sudo fdisk -l
The output lists your disks :
   Device Boot      Start         End      Blocks   Id  System
/dev/sda1   *           1        2473    19864341    7  HPFS/NTFS
/dev/sda2            2474       19456   136415745    f  W95 Ext'd (LBA)
/dev/sda5            3279        6374    24868588+   7  HPFS/NTFS
/dev/sda6            6375       19456   105081133+   7  HPFS/NTFS
/dev/sda7            2474        3237     6133760   83  Linux
/dev/sda8            3237        3278      330752   82  Linux swap / Solaris

Partition table entries are not in disk order

Disk /dev/sdb: 3974 MB, 3974103040 bytes
4 heads, 16 sectors/track, 121280 cylinders
Units = cylinders of 64 * 512 = 32768 bytes
Sector size (logical/physical): 512 bytes / 512 bytes
I/O size (minimum/optimal): 512 bytes / 512 bytes
Disk identifier: 0x00000000

   Device Boot      Start         End      Blocks   Id  System
/dev/sdb1               1         611       19544   83  Linux
/dev/sdb2             612      121280     3861408   83  Linux

Note : sda identifies your hard drives (or partitions) while sdb (or c, d, ...) is used for removable disks

My SD Card is referred as /dev/sdb and it currently has 2 partitions.

3. Clear the partition table

sudo fdisk /dev/sdb/
At the fdisk command line prompt, enter 'o'. It will create a new virtual  DOS partition table :
Building a new DOS disklabel with disk identifier 0xd39a6636.
Changes will remain in memory only, until you decide to write them.
After that, of course, the previous content won't be recoverable.
Now enter 'p', it will display the SD Card properties. Note the card size somewhere, we will need it later :
Disk /dev/sdb: 3974 MB, 3974103040 bytes
...

4. Set SD Card geometry

Enter 'x' to go into the expert mode.

The setup configuration is : 255 heads and 63 sectors (512 bytes each). We need to calculate the number of cylinders :

cylinders_nb = card_size_bytes / heads_nb / sectors_nb / sector_size

Here :

cylinders_nb = 3974103040 / 63 / 255 / 512 = 483, 15

The result must be rounded down, which means that cylinders_nb = 483.

Enter 'h' and set the heads number :
Expert command (m for help): h
Number of heads (1-256, default 4): 255
Enter 's' and set the sectors number:
Expert command (m for help): s
Number of sectors (1-63, default 16): 63
Warning: setting sector offset for DOS compatiblity
Enter 'c' and set the cylinders number :
Expert command (m for help): c
Number of cylinders (1-1048576, default 121280): 483

5 . Create a FAT32 partition (boot partition)

Enter 'r' to go back to normal mode.

Follow these steps :
Command (m for help): n
Command action
   e   extended
   p   primary partition (1-4)
p
Partition number (1-4): 1
First cylinder (1-483, default 1): 1
Last cylinder, +cylinders or +size{K,M,G} (1-483, default 483): +50

Command (m for help): t
Selected partition 1
Hex code (type L to list codes): c
Changed system type of partition 1 to c (W95 FAT32 (LBA))

Command (m for help): a
Partition number (1-4): 1

6. Create a Linux partition (root filesystem)

Command (m for help): n
Command action
   e   extended
   p   primary partition (1-4)
p
Partition number (1-4): 2
First cylinder (52-483, default 52): (press Enter)
Using default value 52
Last cylinder, +cylinders or +size{K,M,G} (52-483, default 483): (press Enter)
Using default value 483

7. Apply the partition table to the card

Enter 'p' and verify that you have these 2 partitions :
   Device Boot      Start         End      Blocks   Id  System
/dev/sdb1   *           1          51      409626    c  W95 FAT32 (LBA)
/dev/sdb2              52         483     3470040   83  Linux
Enter 'w' to write it on the card.

Format the SD Card

1. Format the DOS partition

sudo mkfs.msdos -F 32 /dev/sdb1 -n DOS

2. Format the Linux partition to ext3

sudo mkfs.ext3 /dev/sdb2 
And that's it ! To avoid doing this manually everytime, the Pi-community have written some scripts that execute these commands for you. One of them can be found here and all you have to do is :
# Make it executable
chmod +x mkcard.txt
# Run it (use your own disk node ! )
./mkcard.txt /dev/sdb

Build vanilla kernel for Raspberry Pi

Check this post if you're looking for the build instructions.
Check this post if you're looking for the git main commands.


Raspberry Pi's official kernel git repository :


We could have cloned this repository, built it and ran a linux on our Pi.... yes we could, but we are a bit sadistic and as they say in my fitness club : "No pain, no gain". So let's try something fun : cloning the mainline kernel ( the latest stable version ) and adapt it for the Pi.

Our repository is hosted on bitbucket - which is free by the way - and is a clone of the mainline kernel 3.8.9 :


What we need to do first is grabbing the raspberry Pi's defconfig file. Manually configuring the build would take too much time and requires strong technical skills. This method will be experimented later...
Now we got the file, copy it to arch/arm/configs, and run :
make bcmrpi_defconfig
(ARCH and CROSS_COMPILE must be defined)

First build attempt will fail with :
ERROR: "v7wbi_flush_kern_tlb_range" [drivers/staging/zsmalloc/zsmalloc.ko] undefined!
make[1]: *** [__modpost] Error 1
make: *** [modules] Error 2
Not surprising, otherwise a git repository dedicated to the Pi would certainly not exist. The next step is to modify our sources to make them build for the Pi.

Generate a patch to merge the vanilla sources with the rpi ones

The following method is not really the best way for the patch generation, you should consider using git format-patch instead, but, if like me you're living in a building with a poor internet connection, you may want to do it like this :

1. Download the official linux rpi-3.8.y archive from github (about 100 MB, not a big deal compared to GBs of data that you have to download using git fetch command with the rpi remote repo)
2. Create a local git repo with your rpi sources :
# Create a directory where you'll store the rpi linux sources
mkdir rpi-3.8.y
cd rpi-3.8.y
# Move the archive to the current directory
mv /Downloads/linux-rpi-3.8.y.tar.gz .
# Extract it
tar -xf linux-rpi-3.8.y.tar.gz
# Initialize the repository
git init
# Add all elements
git add .
# Commit them
git commit -m "added : rpi-3.8.y sources"
3. Let's assume that your vanilla kernel sources are in a directory named linux_vanilla_kernel :
# Add the vanilla kernel git repo 
git remote add vanilla ../linux_vanilla_kernel/
# Fetch the vanilla kernel repo
git fetch vanilla
After a while, you should obtain an output saying that a branch has been created with vanilla kernel sources :
master --> master/vanilla
4. Generate the patch
git diff --no-prefix master/vanilla HEAD > patchfile

5. You can now apply the patch to your vanilla kernel sources
# Move the patch to your vanilla kernel working directory
mv patchfile ../linux_vanilla_kernel/
cd ../linux_vanilla_kernel
# Apply the patch
patch -p0 < patchfile
6.Build again
make bcmrpi_defconfig
make -j8
The build process should end successfully now.


biz.